Throughout my time creating this wire model I had quite a few struggles. In the beginning I ha a lot of issues with how to put together the wire figure and creating the pose that I needed to reflect the character I had created. Once I had that part done, each week something would snap and would then have to tape steps back. This held me behind from the class, and as such I knew I would have to put more time into it. We used thin wire to create the wire sculptures that we would later wrap with tinfoil to shape the figures body, giving it more life. After packing on the tin foil, I then had to wrap my wire figure in polymer clay to give my character curves and features she otherwise would not have had. I found it rather easy using the polymer clay however, I did notice it became harder to use the longer I spent on it. It became sticky and would refuse to go on and actually stay. Once I managed to wrap the polymer clay, I used specialised tools to help me create definition and make small details such as her nose and the way her dress has a floating effect. I spent a lot of time smoothing out the clay around my characters body making sure she was in proportion and she would not crack while being fired in the furnace. we fire the models so they become solid and are able to handle them without ruining little details, this way we would be able to paint them whilst keeping all the definition we worked hard on creating. As I created my character small, I knew I would struggle with her face. I did not want to ruin my character with small details and as such I decided to change her character slightly and I do believe this actually improved my character making her more unique. to give it more of a textured look, I used real white feathers on her wings which contrasted against her painted body, this gave her the angelic feel I was going for. For her hair, I used hair cut from dolls I bought cheap to give her actual texture as I did not think she would have suited polymer clay as hair. As I have created her hair using actual hair, it gives her a sense of life and flow. Even though I could not get the exact colour I would have liked for her hair, I am still pleased with how the overall model looks. As this is my first time created a scaled model I knew I would not have made it perfectly. If I was able to do it again I knew that I did not need to rush certain areas and I would also have out more time into the wire model itself. I could have looked at how over sculptures start theres to see how I could have made it easier for myself.
Category: Unit 6
3D Model Final

 Unfortunately, during my model making process, my model continually broke and snapped in awkward places and as such I was held back a few weeks and had to end up rushing my final outcome. By adding real textures such as feathers and hair the model becomes more interesting and distracts from the other areas that are not as good quality. I used long craft feathers to create the wings and tried to get a one wing out and one wing folds effect. I believe I achieved this effect even though it does look a little out of place and even wrong to some. I used real human hair that was given to me by a classmate, this gives the model a more unique and obscure look and helps it stand out. I was also able to style the hair slightly, however I quickly found that the hair style my original character would be impossible to achieve. The glue I had to use had harden most of the hair and left sharp edges, this stopped me from doing any styling and as such I decided to use her hair to hide some unpainted areas and areas that had cracked in the kiln.
If I was to do this model again I would know how to heavily improve it. By changing the original wire material I would be able to make the bass stronger and even change the base wire model to help fit my character better. Giving better propositions and an easier way of wrapping the tin foil and clay around. I would also take more time on the hair and find other ways of creating a style with it and how to avoid the hardened glue issue.
3D Wire Model
For my wire model, I am using thick wire to create the skeleton base, thin wire to shape the head, making it 3D and easier to wrap tin foil and clay around together a solid head base.
To build up the body, I will be wrapping the skeleton with tin foil to flesh out my base and create a good surface to start building on. I will most likely not have to smooth out the tinfoil as the polymer clay will be thick enough and create a smooth surface to paint onto to bring my character to life.
Clay Animation GIF
Today we used polymer clay to create simple and rough characters for a quick animation. We had 30 minutes to create a polymer character and 30 minutes to create this animation. For my first time doing a clay animation I am rather happy with how it turned out even though I know it could do with a few more frames. 
Final Character Designs
Here is some rough and quick colored sketches of my main character in 360 degrees poses and positions to decide what colours I should make my character.
I wanted he colours to be soft and pastel like, aesthetically pleasing as she would be a gentle and caring with soft feminine features.

Demon Control Diagram Final
Demon Control is the name of my God game. This game is not as fleshed out as my first game concept simply because I do not have had experience in God games and there is not much online about them as they are such a small genre of games. This unfortunately made it hard for me to do any research for this task and even harder for me to design a game and characters for this game. However I am very proud of what I have managed to come up with and I love my characters I have designed and I love the tradition true story lore behind it all.
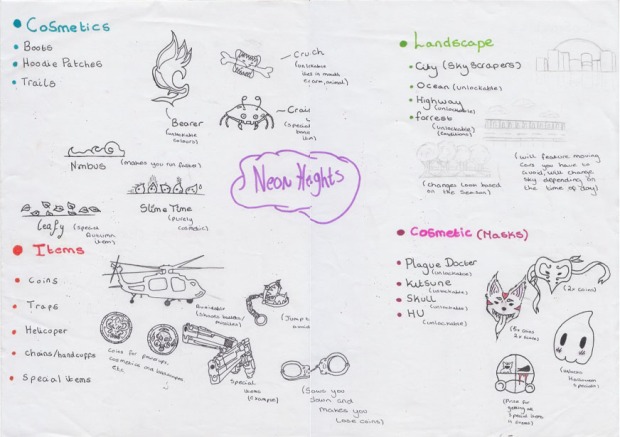
Neon Heights Diagram Final
Neon Heights is my first game concept and is the most fleshed out game wise. I would have loved to do this as my final character and I would have done however I was under the impression I was going to use it in another project. If I was able to made a real side scroller game this is the first thing I would turn to. I love the ideas I came up with and how I managed to create all those ideas for customisation and character lore.
Games Research
To start off my book, I decided to research some games in order of game genre. Third Person/First Person, God games and side scroller/Platformer. Each page has three types of games with some information about them as well. I also have decided to draw my own character from that game in my own style to show artist ability. I am very proud of these first few pages and I might even use some of these drawings again.
Neon Heights Overview

Neon Heights (Diagram)